Tag Archives: E

The Giggly Girls’ Perspective – Back to Homeschool

Giggly Girls' Perspective

I decided this year, I would give you a little bit of insight into the giggly girls’ perspectives on homeschooling.

E, age 11

E – age 11

What I like about Homeschool:

  • We don’t have an exact schedule.
  • We get breaks whenever we want.
  • We get fun field trips even when we’re older.
  • We’re on a review crew so we do most of our school on those products.
  • I only have 2 teachers! Yay!
  • I can learn things like sewing and cooking.
  • We can watch TV.

What I don’t like about Homeschool:

  • Everything is harder!
  • Reviewing math programs!

L, age 9

L – age 9

I think homeschooling is really fun. I like it a lot, and for a lot of reasons. One reason is because we, well, I, get to learn cursive. My mom says that public schools don’t teach cursive anymore, which I think is wrong. I also like it because while I do my writing, cursive, memory work, history, art, science, and math, I never feel pressured, like I sometimes did at public school. There it sometimes felt like it was about finishing your work, not learning. And, in first grade, my teacher only taught me half of telling time! I like homeschooling much better, and here, we add in God!

J, age 6

J – age 6

What I like about homeschool is the math and the writing.

Truly, these are their own words. We edited spelling and some of the grammar together. But, I did not edit their sentiments at all. Ya’ll, kids get the difference. I felt really, really happy when I read what L wrote about the pressure. She was 6 at the time. 6! And feeling the stress and pressure of completion, but not learning. It just makes my heart sing all the more that we brought them home.

When you start looking at research, there are so many reasons to bring them home. As E gets into her teen years, I see the difference that sleep makes. She is able to get the sleep she needs, which makes her attitude and ability to learn better. There is research being shared more often now that shows that the accumulation of lack of sleep is detrimental to young people. I am so glad that we can allow them the sleep they need, the learning the yearn for, and the enjoyment of subjects that “float their boat.”

I am not knocking public schools but I understand their hands are tied. My children are worth the investment of my time, effort, and money (yes, money – homeschooling is not cheap, though there are plenty of ways to cut costs – check out this post for some of my ideas). Not parenting them, of which overseeing their education is a part, has much, much too high a cost – our children.

I am so thrilled at the joy my girls are finding in education at home. Not school at home but education and learning. We are looking forward to a fun, enjoyable year filled with a variety of Review Crew products and delight led learning. Bring on the horses, sewing, cooking, writing, and math.

A list of all posts related to the Back To Homeschool Blog Hop 2015 came be found under the Back to Homeschool page.
At Home.

Back to Homeschool Blog Hop

This post is part of the Back To Homeschool Blog Hop, sponsored by School House Review Crew and Homeschool Blogging Connection. There are over 50 bloggers participating in the blog hop so you have lots of reading to do! Click on the picture to be taken to the listing of all participating bloggers and find something to encourage you today.

V is for … Very First Cake

So I am going to try to sneak this one in just under the wire for the week. Otherwise, I won’t have an ABC post for the week and, well, I just don’t wanna do that! So, V is for Very First Cake.

Today is E’s 11th birthday. I had the cakes all baked and ready to put together. Out of the blue she asked if she could help decorate it. Ummm – YES! So, she designed and decorated her own cake today. I helped her and gave her lessons with it along the way. But, she did 95% of the decorating. Any that I did was to show her the techniques and help her out with some rough spots. Here’s her process and cake:

V ice a cake

V design on cakeV final design

Make It Work Monday: doll capes

capes title

I am a saver. I save WAY too many things in case I might need them later. I am working on that particular issue and doing better. Sometimes, though, that saving tendency comes in helpful. To make capes, for example.

E and J wanted to make capes for their dolls. We didn’t want to get the sewing machine out and J is a bit too new to sewing to work with doll sized clothes on the sewing machine. (If you haven’t ever done that, it takes some serious finesse!) So, we pulled out the bag of felt scraps.

Felt is excellent for this type of activity. It doesn’t unravel so it doesn’t have to be hemmed. You can hem it but you don’t have to. It is fairly easy to cut, especially if you have sharp scissors. It is easy to hand sew on. All good reasons to have this project be done with felt.

capes 3

So, the girls both picked a pretty dark blue felt to create their capes out of. To decide how wide the fabric needed to be cut, they wrapped the cape around their doll and decided how full the cape should be. This determined the short edge of the rectangle. Then, they each decided how long they wanted their capes to be. This determined the length of the long edge of the rectangle. We cut a rectangle out of felt the length they wanted. We then folded it in half lengthwise. We cut the bottom edge (short one) in a quarter-circle. We also cut the other short edge in a quarter-circle but only off of one corner. The cape J chose to make follows a slightly different bottom curve because she was designing it based on an existing piece of doll clothes and she wanted it to have a scalloped bottom edge. It was a bit trickier to cut so after, she cut the cape a bit longer than she wanted following the instructions here, I cut a scalloped edge on it for her.

capes instructions

After getting the felt cut to the right length and curves for each doll, the girls cut and sewed on small pieces of Velcro at the neckline. After teaching them how to thread needles (or reminding, in E’s case) and tying knots in the end of the thread, they sewed it on.

capes 4After they got the Velcro sewed down tight (it needs to be tight because it will take a lot of use from little hands), they rummaged through the trim bag that I have and picked some things to trim their capes with. Hand sewing trim takes different techniques depending on what kind of trim you are working with so each girl got a couple of different kinds of instruction. Then they went to work sewing down the trim.

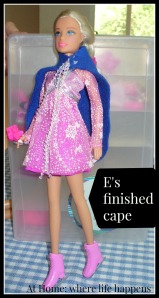
capesAfter a short while, their capes were finished and ready to be modeled by the dolls. So, here are the finished capes.

capes 6 capes 5

And here are the dolls modeling the new fashions.
capes J finished capes E finished

Another fun sewing lesson, making use of things we already had around the house. What have you done recently to make something work? Please share your activities in the comments section and if you have a blog post or other link to pictures of it, please share that too. I’d love to visit your site to see what you have done! At Home.

Talking about Mammoths, part 2

mammoths part 2

We did a few things relating to the mammoths this week. (See the post on our field trip.) But, I was not in a terribly creative mood, I guess, because I had some real trouble thinking up some ideas. So, after we had used the files from the Waco Mammoth Site, I went with a bit broader category: fossils.

The Waco Mammoth Site has a lot of educational printables for various age groups. I went through and picked out a few for each of the girls that I felt would appropriately challenge or review materials. Here are the ones the girls did.

mammoth L mammoths E mammoths J


On E and L’s scientific name worksheet, it had them create their own animal using scientific names and draw it. After they had done that, I had them brainstorm ideas about what happened to their animal and more specific details about their animal. They had to come up with a lot of words about their animals. Once we had a white board full, each girl was asked to create a story or a poem or a written account of their animal. I don’t have copies of those finished products but the girls enjoyed that writing assignment.

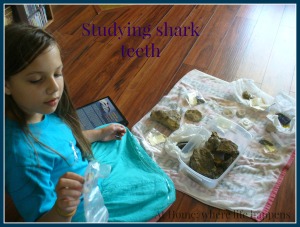
On another day, we explored fossils. We got down all of the fossils that we have tucked away. E and L got down on the floor (so that dropped fossils would be less likely to break and the floor would be less likely to be damaged) and touched, examined, talked about, felt, and explored the fossils we have. We have various real fossils and then we have a few that were made by pressing a shell or other natural object into plaster of paris or air dry clay. The girls spent probably 45 minutes discussing and talking about all of the fossils.

mammoths shark teeth mammoths fossils

After their chatter began dying down, I handed them a worksheet I had created and asked them to each choose one fossil to complete the worksheet on. This included a measuring activity in both inches and centimeters. There was a box to describe, factually, what the fossil was like. They were encouraged to describe it with as many of their senses as they could, as well as anything specific they could observe about it. There was place for them to draw their fossil. One box had them describing where their fossil might have been found. And a final box had them describing what the fossil might be from and why. They were also asked to color-code their page: blue for facts and yellow for opinion/theory/hypothesis.

mammoths fossil sheet

It surprised me that the girls were excited to complete these. E actually asked to complete two of these, so I let her. They also choose to sit down together and share their findings.

mammoths sharing

After these were completed, we got out our posters on poetry styles. We reviewed poetry styles, including limericks, lyrical poems, cinquain, and more. They each chose one style of poetry to use and wrote a poem about their fossil. L’s favorite style is always lyrical; she loves rhymes and descriptive phrases and long, flowy sentences. E’s favorite style is almost always cinquain. Here is their poetry.

mammoths E poems mammoths L poem
I am linking below to the information page the girls filled out. You are welcome to use this and share it but please link back to this post when you are sharing it.

Fossil worksheet

Our mammoth and fossil study has been fun. I have a couple of other ideas that I would like to do but we’ll see if they happen or not! Please share with me if you study mammoths or fossils or something related. I’d love to know what you do. At Home.


Birds of a feather…

Birds of a Feather

You know the old saying: birds of a feather flock together. Well, we wanted to observe whether that was true. Turns out, it is!

We spent our month bird watching. We found an awesome book that helped us get started and then just spent time watching. We stumbled across this book at the museum and when I saw it, I KNEW it was THE BOOK for the theme of The Great Outdoors with the Poppins Book Nook virtual book club.

The book is “Look Up! Bird-watching in Your Own Backyard” by Annette LeBlanc Cate.

Look Up!

Written in a cartoon-ish style that is conversational, the book begins with the do’s and don’t’s of bird-watching. For example: Do only go to places you know are safe. Do give birds their space! Don’t ever frighten or bother parent birds and their babies. Don’t put yourself in harm’s way, ever!

Early on, Mrs. Cate hooked me with “no matter how small your corner of the world, there will be some birds in it.” Yep. More than I imagined once I started observing! She talks about how to start and where to start. She encourages you to begin sketching birds at once, as that helps you notice the details of the bird and will help you keep a record of what you have seen and how long you have been participating in this hobby later on.

Throughout the book, the birds keep you laughing as you read their conversations designed to help you learn. The charts in the book are tremendously helpful, such as the “A Rainbow of Color” chart and the “Shapes are Clues” chart. While reading through the book, you learn tons of proper terminology AND exactly what they are referring to. Crest – you know it is not the toothpaste by the time you finish the page. You know that it is the top part of the head and its’ unique shape which will help in identifying birds such as cardinals, roadrunners, and woodpeckers.

There is so much information in the book. I wish I could share more but it is pretty hard to without pictures. The copyright is clear on this one and so I cannot take pictures of the book. I sure wish I could because it is amazing! I cannot possibly do this book justice. You really need to go get this book!!

Our favorite place to sit together and watch the birds was our backyard. Now, we have no trees. But, the property behind us has some and the birds love them! So, we’d sit out on the back patio watching the birds and spending time together.

looking

I was in for some surprises. My youngest giggly girl only wanted to play with the binoculars. It was fun to see the birds for a few minutes but she didn’t want to sit and observe. This surprised me because she loves to look at animals. All the time! This was the one I expected to spend the most time with sitting and observing. Surprise! Turns out that E, the oldest giggly girl, was the one who loved to sit and watch with me. We spent hours together, just enjoying the outdoors and each other, finding joy in spotting a bird and excitement when we could identify the bird.

Texas Birds

As recommended in Look Up!, we also picked up a field guide to familiar Texas birds. It ended up being terribly helpful. We kept both of the books next to us as we sat and watched. Once in a while, one of us would grab the field guide and try to identify a bird because we got a good enough look at it that we found some detail. Some of the birds we saw this month: cardinals, mockingbirds, doves, ladder-backed woodpeckers, chimney swift, house finch, American robin, and barn swallow. I am not certain but we think we saw a scissor-tailed flycatcher, a hawk of some sort, and some kind of hummingbirds. And these are just the ones we came somewhat close to identifying!

birds

Although plans for other outings were hampered by rain, we did head up towards the dam on the lake to see what we could see. While we could hear a lot of birds, we could not see very many of them. There were a couple that had some interesting shapes but we couldn’t get close enough to get any details on them. E saw one big bird flying and was able to identify it as a hawk of some sort because she had read about looking at the tail. She was able to recall that it was a fan shape and had a band of white on it. That was enough to go through the guide with and she was able to identify the hawk. Fun! For me and her! She was so proud of herself to have noted that and been able to use that to help her identify the bird.

at the dam

I intentionally spent the month with a project that was not crafty but rather observational. It allowed us to be with each other instead of focusing on an activity. We got a lot of chatting in quietly while waiting for a bird to show itself. It encouraged being outdoors on an ongoing basis and is something that we will continue for weeks and hopefully months. I have high hopes for this because the other day as we were driving along, E called out “Mom! I saw a bird! Can we turn around and go look?”


Poppins Book Nook main image 2014 - 2015

Clip Art by Melon Headz

Be sure to visit the co-hosts for Poppins Book Nook and see what each of them did for this month’s theme of The Great Outdoors.

Enchanted Homeschooling Mom ~ 3 Dinosaurs ~ To the Moon and Back ~ Planet Smarty Pants ~ Farm Fresh Adventures ~ Growing in God’s Grace ~ Chestnut Grove Academy ~ Learning and Growing the Piwi Way ~ The Usual Mayhem~ Preschool Powol Packets ~ Monsters Ed Homeschool Academy ~ Adventures in Mommydom ~ Teach Beside Me ~ Life with Moore Babies ~ Kathy’s Cluttered Mind ~ Are We There Yet? ~ Our Crafts N Things ~ Hopkins Homeschool ~ ABC Creative Learning ~ Joy Focused Learning ~ P is for Preschooler ~ Laugh and Learn ~ A Mommy’s Adventures ~ Inspiring 2 New Hampshire Children ~ World for Learning ~ Ever After in the Woods ~ Golden Grasses ~ A glimpse of our life ~ Journey to Excellence ~ Happy Little Homemaker ~ Little Homeschool Blessings ~ Raventhreads ~ Tots and Me ~ As We Walk Along The Road ~ Stir the Wonder ~ For This Season ~ Where Imagination Grows ~ Lextin Academy ~ The Canadian Homeschooler ~ School Time Snippets ~ Peakle Pie ~ A Moment in our World ~ Every Bed of Roses ~ Finchnwren ~ At Home Where Life Happens ~ The Library Adventure ~ Embracing Destiny ~ Day by Day in our World ~ Our Homeschool Studio ~ A “Peace” of Mind ~ Thou Shall Not Whine ~ SAHM I am ~ eLeMeNo-P Kids ~ Simple Living Mama

Connect with Poppins Book Nook on the web, and on Facebook.

A Review – Progeny Press

Title pic

In our house, literature is all around us and everyone in the family constantly has at least one book going. That made Progeny Press appealing to us – study guides for literature from a Christian perspective.

Progeny Press Review

We have been studying two different books using Progeny Press Study GuidesLittle House In The Big Woods and The Courage of Sarah Noble. Progeny Press Study Guides have a couple of things in common, even though Little House In The Big Woods E-guide  is recommended for use by 4th-6th grade students and The Courage of Sarah Noble E-guide is recommended for use by K-3rd graders. Both of our study guides began with notes to the instructor. Next is a synopsis of the book and information regarding the author of the book. Following the author’s page, we found facts about the time period and the part of the country that the book is set in. Both of our study guides also included some Before-You-Read Activities, which helped set the tone for the book and guide. Another way in which both of our study guides were similar is that the lessons were set up in groups of 2 chapters at a time. These lessons always included a set of vocabulary words and definitions with various activities to engage the student. These lessons also always included a set of questions, though the set up of these was dramatically different between the K-3 study guide and the 4-6 study guide.


Progeny Press Review

 Little House In The Big Woods Study Guide

This guide was used by our oldest giggly girl who is 10 years old. I had been wanting to get her started on the Little House books and this was a great opportunity to introduce these wonderful books to her. She read straight through the book when she first got her hands on it. She wasn’t asked to do this but it worked out good, since this is recommended by Progeny Press. (They recommend, at least at this level, that the student read the whole book through first and then go back and work through the questions in two chapter sets.)

We started by having E read the synopsis, the author information, and the background information. We then talked about these things, especially the background information. We completed a couple of the Before-You-Read activities. Paul Bunyan storyShe searched on the computer for information on Paul Bunyan and read the story of the lumberjack. We also found a video of the Paul Bunyan story that was entertaining. We also pulled out our big US map (remember the one from our states study?) and found Wisconsin on it. That allowed her to review a bit about what Wisconsin is famous for and words that describe the state. The activity in the study guide asked us to study a map of Wisconsin, so we located one of those (actually found one from the Laura Ingalls Wilder museum) and studied where Pepin was (on the Mississippi) and where the forests of Wisconsin were and are currently.

Then we jumped into the lessons. Each lesson began with a vocabulary activity, focusing on 5 to 10 words and their definitions within the context of the story. Most of these words are ones that I would have chosen myself because they are used differently or not at all in our society or lifestyle. Some examples of words include kegs (for a barrel to hold items in), sullen, sulked, bored (with a knife), and flatirons. The activities varied from lesson to lesson. In some the word was given and the student was asked to consult a dictionary and write the definition. In another, the student was given a short definition and had to unscramble the letters to find the word. In yet another, the student was given multiple-choice answers to choose from. This variation helped to keep the interest in a task that can be dull and boring.

hasty pudding

In the questions for Little House In The Big Woods, there are two sections. One is titled Questions. The other is titled Digging Deeper. The Questions section is lower level thinking (information and comprehension levels of Bloom’s taxonomy). These are questions that ask you to repeat information from the book, such as “Where were Laura and Mary’s playhouses?” These were very easy, and therefore actually frustrating for E. She did not want to answer these! She was required to answer a few out of each lesson, but we did not require her to answer all of them because they didn’t really add much to her learning. We spent a lot more time on the Digging Deeper section. These questions focus on the higher level thinking (application, analysis, synthesis, evaluation) and are the types of questions that really grabbed E’s attention. She was required to answer almost all of the questions in this section each time. One thing I liked about this section is the questions were quite different – Bible application, social settings, comparing your life to theirs, and so much more. These are the questions that really create a learning situation for E. An example of questions from this section – “What does each child receive for Christmas? How does this compare to what you normally receive for Christmas? Would you be happy with (what they received)? Why or why not?” These push her beyond simply knowing the answer. These make her think and defend her position.

soap carving 2

After the Digging Deeper section, the Little House study guide then gave suggestions for activities that help foster further learning and investigation. We did at least one of these from each of the lessons. For one E made Hasty Pudding. This is cornmeal pudding, not sweet, but very good with a drizzle of honey over it. It surprised us and allowed us to talk about the use of sugar during Laura’s time. Another activity that she did was carve soap. Pa whittled and carved in the book and this activity allowed her to feel what it was like to carve and create. There are 3-4 activities for each lesson and this was our favorite part of each lesson.

soap carving

The study guide finishes up with a crossword puzzle to print and complete. It also has some activities to wrap-up the whole book, including some presentation ideas. We did not make it to this point, honestly. There is so much to these study guides and the activities that we just did not have time to get there, since we had some illness occur during this period. But we made it about 90% of the way through the guide and we will finish it out.

using interactive guide

One way in which this study guide is different from The Courage of Sarah Noble is that it is an interactive PDF file that you download. You can print out the PDF and the student can write all of her answers on the page. We did this and it worked well. It is also set up so that the student can use the PDF file on the computer and type in her answers. We did this, as well, to see what it was like. This has some definite advantages – you don’t have to print it out and use paper and ink; sometimes typing answers helps the student to be more interested; it can be saved as a PDF file and easily added to portfolios. E liked it both ways and she didn’t have a preference of one way over the other. Personally, I liked that printed out, she did not have to be locked in at a computer. She could take it to the couch, her room, or a table. It is more flexible when printed out, in my opinion.


Progeny Press Review

The Courage of Sarah Noble

This study guide was used by our middle giggly girl who is 8. She absolutely loved the book. She also read through it all the way the first time she got her hands on it. Again, this is encouraged by Progeny Press. In my opinion, it helps the student get the big picture of the book and be able to put a lot of it in context when it comes to answering questions.

I do not think this study guide is as good as the other one we were asked to review. It is for a lower age level but it actually has significantly less hands-on activities, which is more important for K-3rd students.

L map workAfter reading the synopsis, author information, and background information with L, we jumped into the Before-You-Read activities. We pulled out a US map and looked at Connecticut. We talked about what we knew about Connecticut and what the wilderness would be like in the 1700s. We answered some of the questions from this section including things like what it would be like to knock on a stranger’s door to ask for shelter for the night. These were good activities to get her mind set on how things were back then as compared to what she knows.

This study guide had an activity that the other did not. It included an As-You-Read Activity. It asked the reader to keep a list all the times Sarah Noble reminded herself to keep up her courage. L kept a list of the times she reminded herself with words and a separate list of when she reminded herself with her cloak. This was an interesting comparison and really brought out how often we all need reminded to keep up our courage in difficult situations.

As with the Little House study guide, each lesson covered two chapters and began with vocabulary work. There were between 5 and 10 words for each lesson. The vocabulary activities varied from looking it up in a dictionary and writing the definition to matching a word to its definition. The words chosen often represented words that we don’t often encounter such as palisade, namesake, and musket. They are great words and, again, are the kinds of words I would have chosen myself.

building a log cabin

The Questions section was structured differently, as well. It only had one section of questions. This section included questions from all thinking levels. There were informational level questions next to analysis questions and evaluation questions next to comprehension questions. This was interesting in that it kept her thinking with different processes throughout. She did not like answering the questions at all but it wasn’t because the questions were not good; I don’t know why it didn’t fit her well. Some examples of questions include “Why do you think Tall John was looking sadly at her?” and “What did her father tell her was the best courage of all?” One part of the questions section that I really liked was that it included some application of Bible verses. Since this is an area our family focuses on, I like that this was included for each chapter.

pretzel log cabin

The Sarah Noble study guide ended with three hands-on learning activities. Activities like these are good but I wish there had been activities like this for each lesson, not just at the end. It would have improved this greatly and perhaps L would have enjoyed it more. L created a log cabin out of pretzels and icing. It was a great learning activity because she realized just how much thought and work has to go into building a house from logs, how many problems can occur. For art, she is going to create a collage of Sarah and her father in the woods. There is also a pebble game similar to that which the Indians might have played with Sarah. This activity actually held no appeal for L so we skipped it.

Buying a Progeny Press Study Guide

To purchase a Progeny Press study guide, visit their website at http://ProgenyPress.com. Their website is easy to navigate and you can easily find what you are looking for. The study guides we used were both digital downloads. Little House In The Big Woods is priced at $16.99 and is an interactive download. The Courage of Sarah Noble is priced at $11.99 and is not interactive. Once you have purchased these, you can download and save the file to your computer. You then print what you need/want or open the file for the interactive PDF, type in your answers, and save it to your computer. If you have any questions, their FAQ is easy to read and gives a lot of information.

Things To Note

* I did not like that the lessons were done in two chapter sets, with no indication of where question answers could be found. This was especially frustrating, in both study guides, with the vocabulary. Since these were set in the 1700s and 1800s, some of the word usage is different and it was not always easy for the girls to accurately define the words the way the books used them. When they had to look for the words in the books to help them out, especially in the Little House book, it could be 40 pages to look through. It was time consuming and frustrating. With the Little House book, the download did include an answer key. That gave the answer but did not give any indication of where the student could locate the information to help them formulate the answer.  (As a side note – I do realize that they cannot give page numbers since each printing of a book will end up with different page numbers. Keeping the lesson to one chapter would certainly help this, though.)

* I say this often but I will say it again: pick and choose to fit your student and your family. These study guides have a lot in them! The oldest giggly girl, E, did not enjoy or need the lowest level thinking questions, meaning those where you are just repeating information from the book. We did not complete every single question. However, in the Digging Deeper section of the Little House study guide, she had to think and apply the information, compare information, or use the ideas from the book in a different way. We did a lot more work in this section because it was more interesting to her and she got a lot out of it.

* These guides are more of a worksheet learning style. I think the guides for K-3 would benefit from a lot more activities and fewer questions. These would fit a family whose learning style is question/answer or a family whose students are older (middle-school/high school).

Final Thoughts

At this time, we are not planning on purchasing more of these study guides. They really do not fit our family’s style of learning. I can see that these will be very good for older students and I do foresee us purchasing from this company when the girls are older. At Home.


To see more reviews on these study guides or study guides for different literature selections from Progeny Press, click on the banner below.

Click to read Crew Reviews

Crew Disclaimer


C is for Convention, Curriculum, and Companions

C title

This last weekend, I was really blessed. The three giggly girls stayed with their aunt and grandparents for Friday and Saturday so that my husband and I could go to the Arlington Bookfair. It was a fantastic weekend away.

We found a cute little bed and breakfast in Duncanville (Alla’s Bed and Breakfast). I wish I had taken my camera with me! It is a small house that used to be home to some of the founding family of Duncanville. They had furnished the home with lots of period pieces. Rick, Alla’s husband, must enjoying tinkering with old electronics because they had lots of period lamps and light bulbs, an 80 year old refrigerator that works, a black-and-white TV from the very early stages of the invention, a color TV from when they were brand new, and a gigantic console radio from the period. The home was furnished with lovely antiques and it was really comfortable. Of course, we got a very good idea of what L will be like when she grows up if her talking habits don’t change – Alla did not stop talking once. Seriously! She had so many stories to tell and lots to talk about. It was lots of fun!

At the convention, we heard some great speakers. I won’t try to name them because I will certainly misname someone or mislabel their topic. I do pretty well taking information in but not so good at spitting it back out with something like this. I got some much needed encouragement and some great intellectual challenges. I am following it up with some pretty in-depth study. That may all come out later as a blog post but for now, lots of reading and thinking and Bible checking.

At the convention, we also found some good curriculum pieces to add to their girls’ school work when needed.

C history We bought Mystery of History book 1, though I was kind of surprised at a couple of things when we got home. I’ll have to preread it (which I don’t mind doing – it is very well written and I love history!) so that nothing catches us by surprise with the Bible part of this history. We also found some blank timelines that the girls will fill in as we work through the history.


C art


We bought Artistic Pursuits for L and J to share.


C cds


We got more of the Maestro Classics, which I am really excited about. We’ll do quite a bit with these over the summer – fun learning but keeping the brain intact and not turning to mush!

C writing


We also bought WriteShop Level D. E had really wanted to be selected for the team on the Review Crew to do this one but we weren’t. So, we bought it and we’ll probably start it before too long because she is so excited about it. (We already have a level of it for L to work on.)


The rest of our purchases were research based. Some of it the girls will end up using but a lot of it was for Joe and I. Creationism vs evolution is quite a big discussion point right now. The girls totally understand that God created the world so that isn’t something we have to deal with. However, as they get older, they are coming across the details in science that conflict with that and we are gearing our brains up to be able to help them understand it all clearly within the science realm of it all. Also, sometimes, you just want something new to read.

C answers books 

C readingC dinosaursC dad booksC books to read

One of the highlights of my weekend – getting to meet Gwen, a fellow Review Crew member. This is the first lady from the crew I have gotten to meet in real life. It is nice to meet someone in person that you are getting to know from your time online. It was fun meeting her and some of her children. (They were so polite and kind and a joy to talk to.) The more Gwen and I talked, the more we found we had in common. It was really a pleasure and a treat to get to meet up with her.C with Gwen


So with convention, curriculum, and companions – C – I am happy, geared up, and ready to go again.

At Home.

Ben and Me

B is for Bread

B is for Bread


A few weeks ago, E participated in a bread making class at church. The lady who taught did a marvelous job of teaching them not just to make bread, but to know and understand the physical attributes of the bread itself and the ingredients used to make them, as well as some fantastic Biblical connections to bread. She took each ingredient and found corresponding verses from the Bible that gave practical application to Christian life. E came away completely in love with bread making.

A few days ago, she decided that she wanted to make bread for the family and she wanted to teach her sisters to make bread. The middle giggly girl was not too interested but the youngest definitely was. You can’t keep J out of the kitchen! So E and J made the bread for Easter lunch and it was delicious. I did hover and help out where needed, but the read the recipe, got out and put away ingredients, stirred, kneaded, baked, and cleaned. It was a beautiful thing to see these sisters working together.

Here is the recipe they used from the King Arthur flour website and the process (mostly) in pictures.

bread making 1 bread making 2 bread making 3 bread making 4 bread making 5 bread making 6 bread making 7

These giggly girls would encourage you to get your hands dirty and make some bread. It is just sooooo good! I know they will be making some more very, very soon. At Home.


Head over to Ben And Me to see what the others have done for the letter B.

Ben and Me


A is for Apprentice


We have begun a new series of blog posts that will take us Blogging Through The Alphabet. This is in conjunction with Ben and Me blog. So, for week one,…

A is for Apprentice

We are currently working on a review for a CD about The Sorcerer’s Apprentice by Paul Dukas. We are really enjoying it and there are so many resources to go with it! You’ll have to watch for the official review. Today, we are going to show you some of the extra activities we did to go with the CD.

Scratch offs –

scratch offs

A friend gave us these scratch off papers she got at the dollar store. We used them to create a picture that reminds us of the tone poem The Sorcerer’s Apprentice. The oldest giggly girl chose the ABCs, because an apprentice is there to learn, and a wand, because the apprentice uses magic to get out of a job that he is too lazy to do. The middle giggly girl chose to create a tapestry. (We are studying Apologia’s “What In The World Can I Do?” and talked about tapestries recently.) She said the music told a story and reminded her of God.) The youngest giggly girl created a picture of all the things a sorcerer would need – hat, clothing, spell books, wand, and more.

Fantasia –

We watched the animation of this piece of music on the Disney Fantasia DVD. This got mixed reviews from the girls but the general consensus is that this was not their favorite version.

Maestro Classics –

We used the booklet that came with the CD from Maestro Classics. It has a few different activities in it. There is a crossword puzzle that the two older giggly girls worked together. There is also a very short matching game, where you match up the composer and two poets with an item that represents them.

Poem –

We looked up the original poem from Goethe and found a line-by-line translation. We read through the poem and the girls acted it out. We then went through some posters that we have of different types of poetry and the two older giggly girls chose a style in which to write their own poems about “The Sorcerer’s Apprentice.”

Piano Music –

piano music

I found the piano music for the March of the Brooms from The Sorcerer’s Apprentice on Making Music Fun. I played it on piano and the girls danced.

Strega Nona –

Strega Nona

We found a book about another magical sorcerer, Strega Nona, and her apprentice, Big Anthony. We borrowed the book and the Scholastic video from our library. We read the book and then watched the video. The girls picked up right away about some of the animation and how it changed or differed from the book. We talked about those changes and why they might have been necessary. They compared the book and movie.


Pitched Percussion –

We pulled up several videos and sound clips on pitched percussion, such as marimba, xylophone, glockenspiel, vibraphone, and chimes. One very good link was from the Dallas Symphony Orchestra. We also used the opportunity to look at pictures of the various pitched percussion and compare them.

DIY Project – Create A Water Xylophone

water xylophone

We got out five 12 ounce jelly jars and E filled them with water to varying heights. The girls took turns exploring the sound with them. Then we talked about the sound differences. Even J, at 5 years old, was able to make the comparison that a fuller jar = a lower pitch and an emptier jar = a lower pitch. They also experimented with using different items as mallets and realized that each different material created a different timbre. (We got lots of music vocabulary in!)

playing instruments

Then, we turned on the music and let them play along with The Sorcerer’s Apprentice.


Tune in next week to see what is chosen for letter B, as we blog through the alphabet with Ben and Me. In the meantime, go visit some of the other blogs that are blogging the alphabet with us.

Ben and Me


A Review – ARTistic Pursuits

ARTistic Pursuits review

When you have girls around, there is just no end to the art that goes on at home. ARTistic Pursuits has made this a true learning experience rather than just doing crafts and I am so thrilled about that!

ARTistic Pursuits Review

ARTistic Pursuits has a slogan that I fell in love with: “THE Curriculum for Creativity.” We are working in and reviewing Elementary 4-5, Book 1: The Elements of Art and Composition. This art curriculum is designed for age 9 and older and takes the student step-by-step through lessons that develop their observational skills and strength their drawing technique. Throughout, it allows the student to show their creativity by choice in the subjects chosen to draw.

The book is set up for success, which I appreciate. It begins with Getting Started. That includes a table of contents and a list of necessary art supplies. Then you come to a page titled “What Parents Want to Know”. That page covers the content of the book and how to schedule the lessons. Each unit is set up with 4 lessons and 5 pages. The first page always deals with building the visual vocabulary. The second and third page cover American Art appreciation and history with direct connection to the visual vocabulary being studies in the unit. Page four is about artistic techniques. Page five is the application of the new technique and topic to a final project for the unit.

Following that is a page for the students titled “What Students Want To Know.” It is written directly to the student, giving them help in how to look at the world around them. It then talks to the student about the different elements of art and prepares them to get into the book, working on their art.

To use this curriculum, you will need a few things. First of all, you will need the printed book. This is available on the ARTistic Pursuits website and is $47.95. You will also need the art supplies, which include items like a sketch pad, ebony pencils, eraser, and more. These can be found locally at art supply stores or you can order packs through ARTistic Pursuits link with Dick Blick. We went local because we already had some of the supplies but, after the fact, wish we had gone with the link they provide.

E working on lessons

During the review period, E has covered three units. She has enjoyed working on her drawing skills but did have a couple of things she wanted to share about the experience. She was very excited about getting an art curriculum just for herself and she has been able to work mostly independently through the materials. We have realized, though, that when it is time for an assignment or project, the detail in the instructions is just not sufficient for her. She wants more specific information about what she is supposed to be doing and how she is supposed to be using the techniques.

What we do now is that she reads through the information for the lesson. She then brings it to me or her dad and we read through it (if we haven’t yet) and help her interpret how she is supposed to be applying the technique to a drawing. She then takes that help and does her drawing assignment.

We have definitely seen her observational skill drawing increase throughout this period and I am excited to see her continue with the curriculum. She definitely wants to continue.

candle2 clock leaf nutcracker

When we decided to homeschool, one of things that I knew we would need to do is to continue with a good art curriculum or program. So far, I had not found one that I was pleased with. Mostly, the art programs and curriculum that I had found were more like doing crafts than growing techniques OR they were a “copy this picture that is put before you” style program. ARTistic Pursuits is nothing like either of these things. Each assignment is an done so that the student has the freedom to choose what object(s) will be drawn using the current techniques. This has allowed E to expand her choices to a number of different objects that are of interest to her on that particular day. Choice is key in enjoyment of art and ARTistic Pursuits allows that in a wonderful way.

ARTistic Pursuits has art curriculum books for all levels. These include:

Sculpture Technique: Construct
Sculpture Technique: Model
The Way They See It (Preschool)
Early Elementary K-3, Book 1: Introduction to the Visual Arts
Early Elementary K-3, Book 2: Stories of Artists and Their Art
Early Elementary K-3, Book 3: Modern Painting and Sculpture
Elementary 4-5, Book 1: The Elements of Art and Composition
Elementary 4-5, Book 2: Color and Composition

If you are looking for an art curriculum, I encourage you to visit ARTistic Pursuits at their website (http://www.ARTisticPursuits.com) and see all that they have to offer or to join them on Facebook. We will be visiting their booth at a convention soon and purchasing another book for the younger giggly girls to grow their art techniques. At Home.


You can see reviews of all of the curriculum levels by visiting the Review Crew.

Click to read Crew Reviews

Crew Disclaimer