Crafting seems to be a constant around here and the idea of having some new ideas and products to work with is always exciting. When we heard about ACTÍVA Products and their Rigid Wrap and CelluClay Quik-Sculpting Kit, we were excited. Miss L loves to create all sorts of things and these materials would be just right. And to make it even more exciting, Activa is offering everyone a copy of their free ebook ACTÍVA Products’ Favorite Sculpture KIDS CRAFTS, which has full-color pictures and directions for creating a number of projects with the kit.
ACTÍVA Products is a company that specializes in crafting materials. They offer paper mache products as well as other several other clay products, colored sand, casting materials, and even a few flower arranging materials. Their site also offers a huge number of ideas and instructions for creating projects with their offered materials. I got a lot of inspiration and have lots of ideas that I want to create.
The Kit

We received the Rigid Wrap and CelluClay Quik-Sculpting Kit for this review. When they arrived, there was a lot of excitement and we immediately pulled out the packages to look things over. In the box, were unlabeled packages and a photocopied instruction sheet. I’ll admit – these kind of dampened the excitement because I had to tell the kids that I had no clue what any of it was or how to use it. Labels would have been good and instructions on each product of how to use it would have been good.
After some research, I figured out that we had two rolls of 4 inch wide Rigid Wrap and one 8 oz package of CelluClay. But I still had to do some reading and researching to figure out how to use them. There was, on the copied sheets, instructions on the Rigid Wrap but I had to go to the website to find a sheet of instructions for the CelluClay. (I found it by searching for CelluClay. There is a link to the sheet on the page for the 1 lb package towards the bottom of the page on the right hand side.)
We did finally jump into projects but it was a bit intimidating. It was also very messy. I was very glad I had covered the table with a plastic cloth. And the kitchen floor had needed mopped anyway. These products create a lot of dust and very fine particles.

Rigid Wrap
Miss L chose to use the Rigid Wrap and created an angel and a rose. Sculpting those from the Rigid Wrap took some patience.

To create the angel, she had to build up the biggest part and add the details slowly, 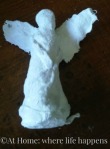 allowing a bit of drying time in between. The wings took some finesse but she just patiently molded and shaped until they were as desired. Then she held them in place and I fanned until they would hold their shape. After she got it how she wanted it, she set it aside to air dry. This took about 5 days to fully dry and it dried to a matte finish white. She has a collection of angels that she loves that are minimally colored and for now, she will leave this one white, as it fits fairly well into the collection.
For the rose, she cut each individual petal and one strip about 6 inches long. Dipping the 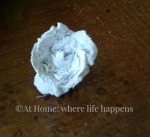 long one into warm water, she then rolled it up for the center of the rose. Dipping each petal into the water, she would add it to the center, adjusting each petal to the shape and placement she wanted. She would then hold it in place while I fanned it to help it set and dry a bit. With so many pieces all on top of each other, it has taken a long time to dry. She had to leave for camp before it was dry so it will be painted when she returns.
I wasn’t as brave but I did want to try the  product myself so I took on the star and snowman ornament from the ebook. Using a cardboard star cut from a box, I cut strips of Rigid Wrap and placed them over the star. Using my fingers to smooth it out and down over the edge, I covered the cardboard. After letting it dry for a bit, I took some of the scraps we had from other projects and used them to scrunch and fashion a snowman. I got the strips a bit wetter so they would stick better to the flat form. I was able to create some definition and depth by twisting and scrunching up the strips as I placed them. After it was fully dry, I painted it. While the yellow paint was wet, I shook some gold glitter down over it to add some sparkle. I hot glued the ribbon onto the back. I kind of like this little snowman. He brought some cool to the hot summer!

CelluClay
The CelluClay, a recycled paper product for instant paper mache, I was a bit leery of. I didn’t feel like I had good instructions. But knowing I needed to at least try it out, I dove in. This product feels like the lint from a dryer. It is just as dusty, too. Please take precaution; inhaling this is awful, causing a lot of coughing. I guessed at how much I would need to make three ice cream shaped pieces from a candy mold I have. I put it into a plastic ziplocking bag and added a bit of water. I added just a bit of water at a time, zipping it closed, and then mashing it around through the plastic to mix it up. Once I felt like it was well mixed, I tried to use it. It was like pulling soggy paper apart and I had to add additional water. I was finally able to get it to a consistency I could use.
I packed it into the mold until it was level on the back and I felt I would get good definition on the front detailing. I then removed it from the mold and added a red bead to be the cherry and to put a cord through. Then, I let it dry. It took about three times as long as I expected for it to dry. I even tried to speed it up, as they recommended, by using a hair dryer. I did that for about 15 minutes and felt like it did not really make much difference. So I left it to dry overnight at that point. When they were dry, I painted them and added the string.

I can see several possibilities for CelluClay now that I have used it. I would love to see the company add good instructions to the kit’s box, either printed on the box or a sheet inside that addresses both products and is easier to read. The project ideas are fantastic and I would love to see more product ideas for CelluClay come with the kit, as well.
ACTÍVA Products has some interesting products and ideas. The Rigid Wrap and CelluClay Quik-Sculpting Kit is a great way to introduce your kids to the opportunities that abound with these products.
At Home.
Others have been creating some amazing projects with this kit, as well. Head over to the Homeschool Review Crew blog by clicking on the banner below to find other projects.


Share At Home: where life happens